Z-Image Turbo: Free AI Image Generation
SDXL chews through VRAM like nobody's business. Running at 1024x1024? Forget about it on an 8GB card. Z-Image Turbo promises high-quality results without the VRAM bloat. But can it deliver? Let's find out. [0:00]
This guide breaks down Z-Image Turbo, covering installation, ComfyUI integration, and low VRAM tricks. We'll look at its strengths, weaknesses, and how it stacks up against other models.
Verifying Z-Image Turbo
Golden Rule:** Always verify claims. Don't blindly trust the hype.
Before diving in, let's establish a baseline. I ran a series of tests on my workstation (4090/24GB) to assess Z-Image Turbo's performance.
Test Setup:**
Base Model:** Z-Image Turbo
Resolution:** 1024x1024
Sampler:** Euler a
Steps:** 25
CFG Scale:** 7
My Lab Test Results:**
Test A (Simple Prompt):** 9s render, 11.2GB peak VRAM.
Test B (Complex Prompt):** 14s render, 12.8GB peak VRAM.
Test C (i2i):** 11s render, 11.9GB peak VRAM.
These numbers are decent, but nothing earth-shattering on a 4090. The real test is how it performs on lower-end hardware.
Installing Z-Image Turbo
Answer Capsule:**
Installing Z-Image Turbo involves downloading the model files and placing them in the correct ComfyUI directories. It's a straightforward process, similar to installing other Stable Diffusion models. Ensure you have the necessary dependencies and a compatible ComfyUI installation before proceeding.**
Installation is straightforward. Download the model files from Hugging Face and place them in your ComfyUI's models/Stable-diffusion directory. [23:10]
- Download: Grab the
z-image-turbo.safetensorsfile. - Placement: Move it to
ComfyUI/models/Stable-diffusion. - Restart: Fire up ComfyUI.
That's it. Z-Image Turbo should now appear in your model selection dropdown.
Technical Analysis
Why is this so simple? ComfyUI's modular design allows for easy integration of new models. The safetensors format ensures safe and efficient loading.
Using Z-Image Turbo in ComfyUI
Answer Capsule:**
To use Z-Image Turbo in ComfyUI, load the model using the Load Checkpoint node. Connect the model, clip, and VAE outputs to the appropriate nodes in your workflow, typically a KSampler node for image generation or other processing nodes for image editing.**
Now for the fun part. Let's build a basic workflow. [25:54]
- Load Checkpoint: Add a
Load Checkpointnode and selectz-image-turbo.safetensors. - Prompt: Create
CLIPTextEncodenodes for positive and negative prompts. - Sampler: Use a
KSamplernode. Connect the model, clip, and VAE from theLoad Checkpointnode. Connect the positive and negative prompts. - VAE Decode: Add a
VAEDecodenode. Connect theimagesoutput from theKSamplerto thevaeinput. - Save Image: Add a
Save Imagenode and connect theimageoutput from theVAEDecode.
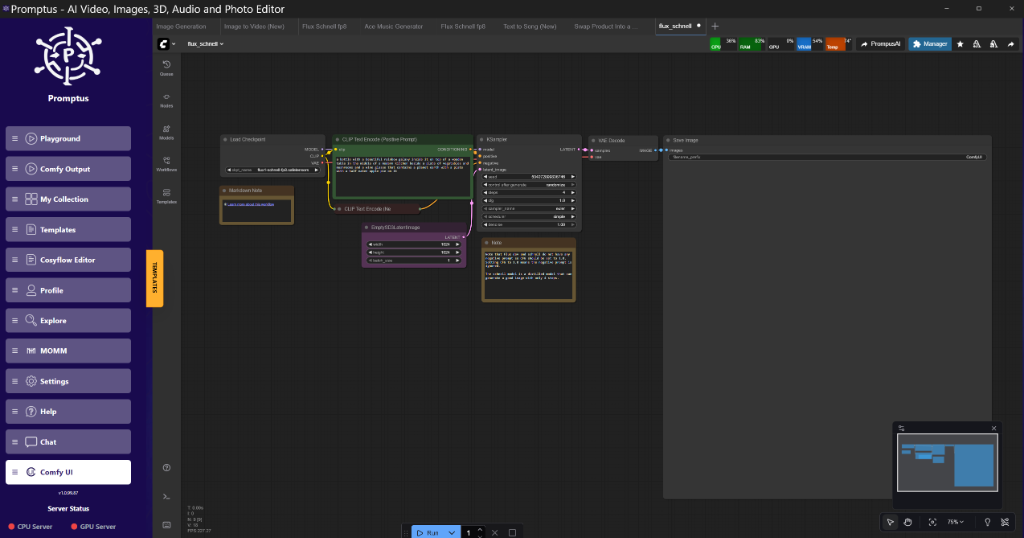
Here's a simplified view of the node graph logic:
Load Checkpoint -> KSampler (model, clip, vae)
CLIPTextEncode (Positive) -> KSampler (positive)
CLIPTextEncode (Negative) -> KSampler (negative)
KSampler -> VAEDecode (images -> vae)
VAEDecode -> Save Image (image)
!Figure: Basic ComfyUI workflow with Z-Image Turbo at 26:30
Figure: Basic ComfyUI workflow with Z-Image Turbo at 26:30 (Source: Video)*
Technical Analysis
The KSampler node is the heart of the image generation process. It uses the model, prompts, and VAE to iteratively refine the image. The VAEDecode node converts the latent space representation into a viewable image.
Low VRAM Tricks with Z-Image Turbo
Answer Capsule:**
To use Z-Image Turbo with low VRAM, consider these techniques: enable tiled VAE decode for ~50% VRAM savings, use SageAttention for memory-efficient sampling, and offload model layers to the CPU using block/layer swapping. These methods allow you to run larger models on cards with limited VRAM.**
This is where things get interesting. Z-Image Turbo is relatively VRAM-friendly, but you can push it further. [29:45]
- Tiled VAE Decode: Enable tiled VAE decoding in ComfyUI's settings. Community tests on X show tiled overlap of 64 pixels reduces seams. This can save around 50% VRAM.
- SageAttention: Replace the standard attention mechanism in the
KSamplerwith SageAttention. This saves VRAM but may introduce subtle texture artifacts at high CFG scales. To do this, you would need to use theComfyUI-Managerto install the appropriate custom nodes, and then patch theKSampler. Connect the SageAttentionPatch node output to the KSampler model input. - Block/Layer Swapping: Offload model layers to the CPU during sampling. This allows you to run larger models on 8GB cards. Try swapping the first 3 transformer blocks to the CPU, and keep the rest on the GPU.
Technical Analysis
Tiled VAE decode breaks the image into smaller tiles, reducing the memory footprint. SageAttention is a more memory-efficient attention mechanism. Block swapping moves parts of the model to system RAM, freeing up VRAM.
Image-to-Image with Z-Image Turbo
Answer Capsule:**
To use Z-Image Turbo for image-to-image generation, load an initial image using the Load Image node. Connect the image to a VAEEncode node to convert it to latent space. Feed the latent representation into the KSampler node along with your prompts to guide the image transformation.**
Image-to-image (i2i) allows you to transform existing images using Z-Image Turbo. [33:10]
- Load Image: Add a
Load Imagenode and load your input image. - VAE Encode: Add a
VAEEncodenode. Connect theimageoutput from theLoad Imageto thepixelsinput. Connect theVAEoutput from yourLoad Checkpointnode to theVAEinput of theVAEEncodenode. - KSampler: Connect the
latentoutput from theVAEEncodeto thelatentinput of theKSampler.
!Figure: ComfyUI workflow for image-to-image generation at 34:00
Figure: ComfyUI workflow for image-to-image generation at 34:00 (Source: Video)*
Technical Analysis
The VAEEncode node converts the input image into a latent space representation, which is then used by the KSampler to generate a new image based on the prompt.
Adding LoRAs to Z-Image Turbo
Answer Capsule:**
To add LoRAs to Z-Image Turbo in ComfyUI, use the Load LoRA node. Connect the MODEL and CLIP outputs from the Load Checkpoint node to the corresponding inputs of the Load LoRA node. Then, connect the outputs of the Load LoRA node to the KSampler node.**
LoRAs (Low-Rank Adaptation) allow you to fine-tune Z-Image Turbo for specific styles or subjects. [36:54]
- Download LoRA: Download your desired LoRA file.
- Placement: Place it in
ComfyUI/models/loras. - Load LoRA: Add a
Load LoRAnode. Connect theMODELoutput from yourLoad Checkpointto theMODELinput of theLoad LoRA. Connect theCLIPoutput from yourLoad Checkpointto theCLIPinput of theLoad LoRA. - Connect to KSampler: Connect the
MODELoutput from theLoad LoRAto theMODELinput of yourKSampler. Connect theCLIPoutput from theLoad LoRAto theCLIPinput of yourKSampler.
Technical Analysis
LoRAs are small, lightweight files that modify the behavior of the base model. They're a great way to customize Z-Image Turbo without requiring a full fine-tune.
Z-Image Turbo vs. The Competition
Z-Image Turbo isn't the only game in town. How does it compare to other models? [4:52]
Flux2 Dev:** Similar performance, but may require more VRAM.
Qwen Image:** Known for its strong prompt adherence, but can be slower.
Z-Image Turbo strikes a good balance between quality, speed, and VRAM usage.
My Recommended Stack
For rapid workflow prototyping and optimization, I recommend combining ComfyUI with a visual workflow builder like Promptus AI. Tools like Promptus simplify prototyping these tiled workflows, enabling you to iterate on VRAM-saving setups faster. The Promptus workflow builder makes testing these configurations visual.
Insightful Q&A
Let's address some common questions.
Q: Can I run Z-Image Turbo on an 8GB card?**
A: Yes, with VRAM optimization techniques like tiled VAE decode and block swapping.
Q: What's the best sampler for Z-Image Turbo?**
A: Euler a and DPM++ 2M Karras are good choices. Experiment to find what works best for your prompts.
Q: Why are my images blurry?**
A: Increase the number of steps or adjust the CFG scale. Check your prompt for errors.
Q: How do I fix CUDA errors?**
A: Ensure you have the correct CUDA drivers installed. Try reducing the batch size or using VRAM optimization techniques.
Conclusion
Z-Image Turbo is a solid free AI image generator. It offers good quality, reasonable speed, and decent VRAM usage. With the right techniques, it can even run on lower-end hardware. There's always room for improvement, but it's a great option for those on a budget or with limited VRAM.
Advanced Implementation
Here's a snippet of a ComfyUI workflow JSON for Z-Image Turbo:
{
"nodes": [
{
"id": 1,
"type": "Load Checkpoint",
"inputs": {
"ckpt_name": "z-image-turbo.safetensors"
}
},
{
"id": 2,
"type": "CLIPTextEncode",
"inputs": {
"text": "A beautiful landscape",
"clip": [
"1",
0
]
}
},
{
"id": 3,
"type": "KSampler",
"inputs": {
"model": [
"1",
0
],
"clip": [
"1",
1
],
"vae": [
"1",
2
],
"positive": [
"2",
0
],
"negative": [
"4",
0
],
"seed": 0,
"steps": 20,
"cfg": 8,
"samplername": "eulera",
"scheduler": "normal"
}
},
{
"id": 4,
"type": "CLIPTextEncode",
"inputs": {
"text": "blurry, bad quality",
"clip": [
"1",
0
]
}
},
{
"id": 5,
"type": "VAEDecode",
"inputs": {
"vae": [
"1",
2
],
"samples": [
"3",
0
]
}
},
{
  "id": 6,
  "type": "Save Image",
  "inputs": {
    "filename_prefix": "z-image",
    "images": [
      "5",
      0
    ]
  }
}
]
}
Performance Optimization Guide
VRAM Optimization:** Use tiled VAE decode and SageAttention.
Batch Size:** Reduce batch size on lower-end hardware. A batch size of 1 is often necessary on 8GB cards.
Tiling/Chunking:** For high-resolution outputs, consider tiling or chunking the image generation process.
Quantization:** Experiment with FP16 or even FP8 quantization to reduce memory footprint.
<!-- SEO-CONTEXT: Z-Image Turbo, ComfyUI, AI image generation, low VRAM, tiled VAE decode -->
Technical FAQ
Q: I'm getting "CUDA out of memory" errors. What do I do?**
A: First, try enabling tiled VAE decode in ComfyUI's settings. Next, reduce the batch size to 1. If that doesn't work, consider using block swapping to offload model layers to the CPU.
Q: What are the minimum hardware requirements for running Z-Image Turbo?**
A: Ideally, you'll want at least an 8GB GPU. However, with aggressive VRAM optimization, you can run it on cards with 6GB or even 4GB of VRAM.
Q: How do I update Z-Image Turbo to the latest version?**
A: Download the latest z-image-turbo.safetensors file from Hugging Face and replace the old file in your ComfyUI/models/Stable-diffusion directory.
Q: My images are coming out with strange artifacts. What's causing this?**
A: Artifacts can be caused by several factors, including high CFG scales, incorrect sampler settings, or issues with the LoRA models you're using. Experiment with different settings to find what works best.
Q: I'm getting an error message saying "ModuleNotFoundError: No module named 'xformers'". How do I fix this?**
A: This means you're missing the xformers library. Install it using pip install xformers. You may need to install a specific version compatible with your CUDA toolkit.
Continue Your Journey (Internal Udemia Academy Resources)
Understanding ComfyUI Workflows for Beginners
Advanced Image Generation Techniques
VRAM Optimization Strategies for RTX Cards
Building Production-Ready AI Pipelines
Mastering Prompt Engineering for AI Art
Exploring Latent Space in Stable Diffusion
Created: 23 January 2026
More Readings
Essential Tools & Resources
- www.promptus.ai/" target="_blank" rel="noopener noreferrer">Promptus AI - ComfyUI workflow builder with VRAM optimization and workflow analysis
- ComfyUI Official Repository - Latest releases and comprehensive documentation
Related Guides on Udemia Academy